Kit Optimizer Manual
Editor tools for Unity scenes: keep one shared asset library across your projects, atlas textures without losing intentional UV sharing, and combine meshes without losing their baked lighting. Apply and Combine have explicit restoration actions, and your original assets are never modified.
Introduction
Kit Optimizer is a Unity editor tool. It helps you build and optimise scenes out of reusable props.
It works only inside the Unity editor. Nothing from it runs in your built game.
It does four jobs:
- Shared asset library. One library folder on your computer holds the props you reuse in many projects.
- You can import project assets, files from your computer (including Adobe Substance 3D Painter exports and PBR texture downloads) and configured scene objects.
- You then drag them into any project. Unity GUIDs are kept, so references between models, materials and textures survive.
- Reversible texture atlasing. Several materials that use the same shader become one material with one set of atlas textures. That means fewer materials and fewer draw calls.
- Islands that share texels on purpose keep sharing them: stacked, partly overlapping, mirrored, or shared between different props.
- Texels are copied exactly, not resampled, unless the content has to be scaled to fit its page or you choose otherwise.
- Reversible mesh combining. A merge group combines compatible nearby static objects into one renderer, keeping their baked lightmaps.
- Different materials are supported. The output keeps one submesh per distinct material, so one renderer does not necessarily mean one draw call.
- The original objects stay in the scene with their renderers hidden and their colliders and scripts intact. A Separate action brings them back.
- Build check. Before you build, one list shows everything that differs from what you declared, with fixes, including Fix all. For example: atlases not generated, out of date or not applied, and merge groups out of date.
What it changes, and what it never changes
Kit Optimizer always works on copies.
- Your originals are never modified. That covers your original textures, meshes, materials and their import settings.
- Outputs are new assets. Atlas textures, atlas meshes, combined meshes and output materials are generated from the originals every time, never from an earlier output.
- Atlases are built from what Unity shows. Import settings that change texels are applied to the atlas texels too: Flip Green Channel, normal maps created from greyscale, alpha from greyscale or none, and channel swizzles.
- An atlas mesh differs from its original only in its first UV channel. A mesh without lightmap UVs is lightmapped through that channel, so its atlas copy keeps the original UVs as lightmap UVs. Baked lighting maps exactly as before.
- Atlas textures take their import settings from the members' maps. That includes filtering, compression, mipmaps (including Preserve Coverage and the alpha cutoff of cutout maps) and per-platform overrides. Platform size limits keep the same share of the full size.
- Applying an atlas switches renderers to the generated mesh and material.
- Restoring uses the recorded originals to switch managed slots back, preserving unrelated edits.
- Combining a merge group hides the members and shows one generated renderer.
- Separating shows the members again and removes the combined object.
- The bookkeeping lives in the scene. Which renderers belong to which atlas, and what they showed before, is stored in a scene object marked EditorOnly. Unity removes it from builds.
Apply and Restore can be undone with Undo (Ctrl+Z).
Important: Restoring can refuse when the recorded originals are missing or ambiguous. Keep the recovery records and outputs until restoration succeeds.
Requirements and limits
| Requirement | Supported |
|---|---|
| Unity | Unity 2022.3 LTS or Unity 6 |
| Render pipeline | Built-in Render Pipeline, Universal Render Pipeline (URP), High Definition Render Pipeline (HDRP) |
| Editor platform | Any editor Unity runs on; tested on Windows |
| Lightmapping | Unity's built-in lightmapper, and third-party lightmappers with their own lightmap storage |
| Shaders | Unity's own shaders for each pipeline out of the box; any other shader through an editable profile |
Unity versions. Tested with 2022.3.6f1, 2022.3.22f1, 2022.3.62f1, 6000.0.60f1, 6000.1.17f1, 6000.2.6f2, 6000.3.23f1, 6000.4.12f1, 6000.5.11f1 and 6000.6.5f1.
Render pipelines.
- Tested with URP 14 and 17, and with HDRP 14 and 17.
- The Home tab shows which pipeline is active.
- Custom pipelines are not tested. Merge groups do not depend on the pipeline. No built-in shader profile covers a custom pipeline's shaders, so its atlases need a profile you define.
Editor platforms. Kit Optimizer is written entirely in C#, with no native plugins, so it runs in any editor Unity runs on. It is tested on the Windows editor. The macOS and Linux editors have not been tested yet.
Lightmapping.
- Merge groups keep baked lighting from Unity's built-in lightmapper.
- This is tested in Non-Directional and Directional mode with Progressive CPU, and with Progressive GPU on Unity 6.6, which has no CPU lightmapper.
- Some third-party lightmappers keep their own per-scene lightmap storage, including MonoSH directional lightmaps. An integration for them turns on by itself when such a lightmapper is installed.
- The Home tab shows whether that integration is active.
Shaders. Unity's own shaders for each pipeline are understood out of the box (see Input profiles):
- Built-in: Standard, Autodesk Interactive, the Legacy and Mobile shaders and Unlit/Texture.
- URP: Lit (both workflows), Complex Lit, Simple Lit, Baked Lit and Unlit.
- HDRP: Lit, LitTessellation and Unlit.
A new atlas picks the matching profile. Any other shader gets an editable generic profile. Output can go to any installed shader.
Note: Lightmappers and shaders from other publishers are separate products. Kit Optimizer does not include them; it works with them when you have installed them.
Status: Validation history, recorded through 2026-10-10. Earlier revisions have automated test evidence, including real Unity lightmapper bakes and a real third-party MonoSH bake. Those results do not certify later changes or every editor/pipeline combination. Android and iOS builds have not been evaluated. Check the release's validation notes and test your scene in a build before publishing.
The full list of known limits is in Limitations.
Installing and updating
Importing the .unitypackage
- Save any scene that has unsaved changes, or close it.
- In Unity, choose Assets > Import Package > Custom Package… and pick the Kit Optimizer
.unitypackage. If you bought it from the Asset Store, you can open it from the Package Manager's My Assets list instead. - Import everything. The tool is installed in
Assets/Kit Optimizer/. - Wait for Unity to compile.
- Open Tools > Kit Optimizer > Kit Optimizer.
Installing as a UPM package
You can keep Kit Optimizer outside your projects and add it as a local package instead. This is useful, for example, to share one copy between several projects while developing.
Add a file: dependency to your project's Packages/manifest.json. It points at the folder that holds package.json:
"com.texelwright.kit-optimizer": "file:C:/Tools/Kit Optimizer"Note: Use one install form per project, not both.
Updating
- Save your scenes.
- Import the new
.unitypackageover the old one, or update the folder yourfile:dependency points at. - Read
CHANGELOG.mdin the tool's folder for notes about the version.
Your atlas definitions, merge groups, library and saved profiles are kept.
Each atlas remembers the tool version that generated it. After an update, the Atlases tab and the Build Check therefore report existing atlases as stale.
Nothing changes in your scene until you regenerate. Click Fix all in the Build Check tab, or Generate on each atlas.
Removing
Restore everything before you delete anything:
- Open each affected scene.
- For every atlas, use Restore originals (or untick Enabled).
- Separate every merge group.
- Confirm that each action succeeds, inspect the members, and save the scenes.
- Resolve any interrupted library placement before removing its recovery data.
- Delete the
[Kit Optimizer]scene objects and the tool's folder. - Delete generated assets only after checking that no scene, prefab, material or other asset still references them.
Important: A restore or disable request can be refused when original assets or recovery data are missing, invalid or ambiguous. Resolve the reported problem before deleting anything. Keep atlas definitions, recovery catalogs and generated output while any restoration remains unresolved.
Quick start
The quickest way to see the whole workflow is the sample scene that comes with the tool. It takes about two minutes.
Open Tools > Kit Optimizer > Kit Optimizer. The window opens on the Home tab.
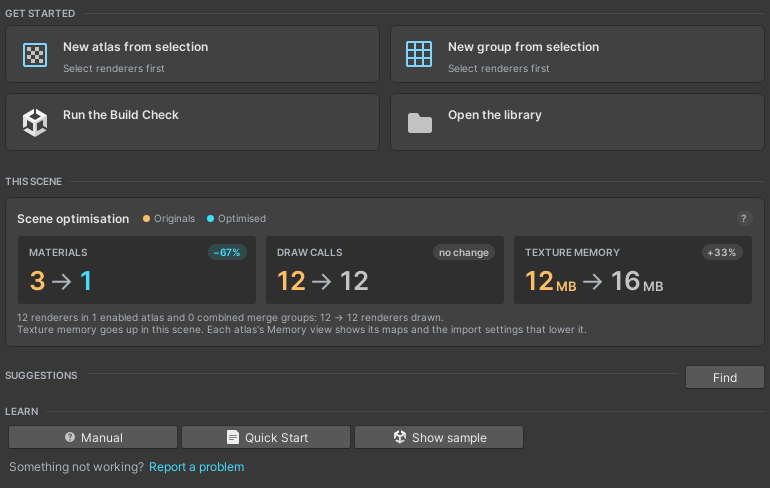
The Home tab: shortcuts to the main tasks, the open scenes' numbers, Suggestions and the Learn row. In the Learn row, click Show sample (in a URP or HDRP project, Import sample the first time). The sample's scene is highlighted in the Project window.
Double-click the scene to open it.
Open the Atlases tab and select Tea Service Atlas.
Click Generate & Apply. The props now share one material.
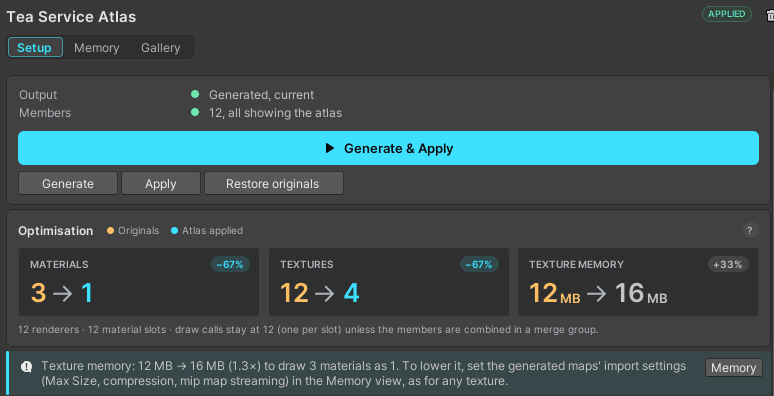
The Setup view after Generate & Apply: the output is current, and the cards compare the originals with the atlas. Click Gallery to compare the originals with the result side by side. Drag to orbit, scroll to zoom.
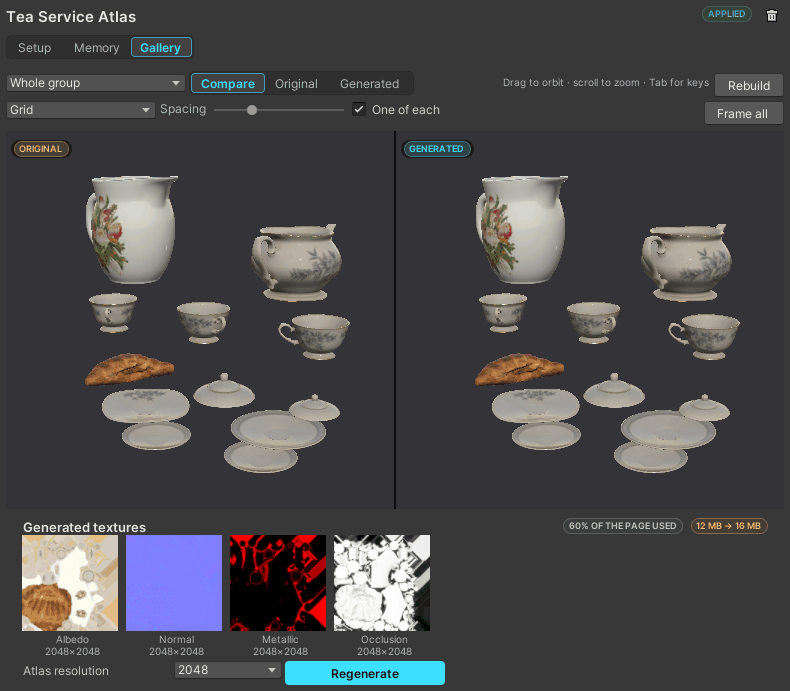
The Gallery view: the originals on the left, the atlas on the right, and the generated textures below. Open the Merge Groups tab, select Tea Service and click Combine. The twelve props are now drawn by one renderer.
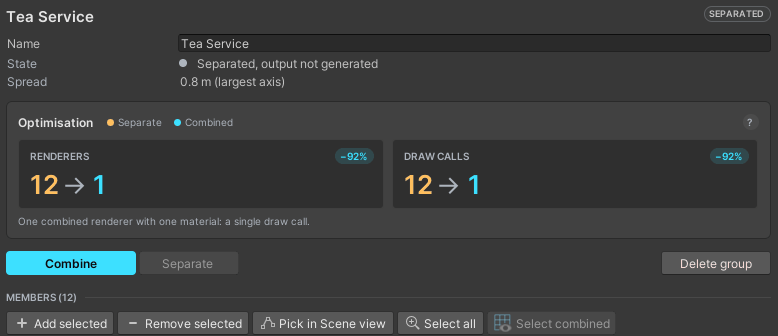
The Merge Groups tab before Combine: the group's state, spread and expected savings. Open the Build Check tab. It confirms that the scene matches what you set up.
To go back, click Restore originals in the atlas and Separate in the group, or press Ctrl+Z.
Note: The sample comes in a version for each render pipeline. The button picks the one for your project, see The sample scene.
Tip: On your own props, start with a selection instead. Select props in the Hierarchy, then click New atlas from selection in the Atlases tab, or New group from selection in the Merge Groups tab. Not sure which props to pick? Suggestions proposes atlases and merge groups for you.
The following sections explain each step in detail: The sample scene, Your first atlas, Combining a group and the build check.
The Kit Optimizer window
Open it with Tools > Kit Optimizer > Kit Optimizer and dock it wherever you like. Everything happens in this one window, apart from a few dialogs.
| Menu item | What it does |
|---|---|
| Tools > Kit Optimizer > Kit Optimizer | Opens the window. |
| Tools > Kit Optimizer > Help > Manual, Quick Start, Third Party Notices | Open this manual (PDF), the quick start and the licence notices. |
| Tools > Kit Optimizer > Help > Report a Problem… | Makes a report to send with your message. |
| Tools > Kit Optimizer > Help > About | The version, copyright and notices. |
Tabs and views
The window has five tabs. The first time it opens on a computer it shows Home. After that it opens on the tab you used last.
- Home: what this computer and project provide, shortcuts to the main tasks, the open scenes' before and after numbers, and the manual and quick start.
- Library: your shared asset library. Choose its folder once per computer, then import, browse and place assets.
- Atlases: your atlas definitions. Each atlas has five views:
- Setup: settings, generation, Apply and Restore, and members.
- Output: which shader the atlas material uses and which generated textures feed it.
- Islands: how UV islands are grouped, with rules to keep chosen islands together or apart.
- Memory: what each generated map costs in texture memory, and the import settings that lower it.
- Gallery: originals and the result side by side in a temporary preview.
- Merge Groups: combine objects, and separate them again.
- Build Check: what differs from the declared atlas and merge state, with fixes.
In the Atlases and Merge Groups lists, a badge shows each item's state. Hover over a badge for details.
- An atlas is Applied, Not applied, Stale, Not generated or Disabled.
- A merge group is Combined, Separated or Stale.
Most buttons and fields show a short explanation when you hover over them.
Note: The window is read-only in Play mode. Changes made during Play mode are lost when it ends, but generated assets would stay.
Note: Atlases and scenes saved by a newer version of Kit Optimizer are shown but not changed. Update the package in this project to change them.
Basic and advanced mode
The window starts in basic mode, which shows what most projects need.
The Advanced tickbox at the right of the tab bar shows the rest. It is visible in every tab. Advanced mode adds packing and detail settings, texel density, texture import and mask settings, texture sets, layout comparison, two more membership tools, the Output and Islands views, and the library's prepared versions. The full list is in Where are the advanced settings?.
Hidden settings keep their values and still apply. When an atlas has a hidden setting changed, its Setup view says so in basic mode.
In this manual, those settings are marked (Advanced).
Before and after numbers
Cards with large numbers show what an optimisation changes:
- the original state in amber,
- the result in cyan,
- and the change in percent.
The ? on each card lists the assumptions behind its numbers.
| Where | What the cards compare |
|---|---|
| Atlases tab, Setup view (after a generation) | Materials, textures and texture memory of the members' slots: originals against the generated atlas. |
| Merge Groups tab | Renderers and draw calls: members drawn separately against one combined renderer. |
| Build Check and Home tabs | The open scenes. Every renderer that an enabled atlas or a combined merge group changes is counted: originals against the state you declared (atlases applied, groups combined). |
The numbers are estimates. A result that is not better is shown in a neutral colour, not hidden.
Draw calls. Atlasing alone keeps one draw call per material slot, so the atlas card shows no draw-call saving. Draw calls drop when the members are also combined in a merge group.
Texture memory can go up or down. Atlasing is for materials and draw calls. It keeps your textures' detail, and the generated maps are then textures like any other, compressed and sized by their import settings.
- Memory can go down when props use small parts of large sheets, because only the texels your UV islands cover are copied.
- It goes up when an atlas page has spare room. Pages are square powers of two.
- It goes up when some texture sets lack maps that others have. Each set gets a region in every map the atlas makes.
- It goes up when the originals are imported smaller or compressed more than the atlas (see the FAQ).
The atlas's Memory view shows each map's cost, and what a smaller Max Size, compression or mip map streaming would save.
Under the card, a box adds what you should know:
- Its members already share one material (yellow). Atlasing cannot remove a material or a draw call, so combine them in a merge group instead. Select members selects them for New group from selection in the Merge Groups tab.
- It uses more texture memory than the originals. The box states it, for example 12 MB → 16 MB to draw 3 materials as 1. It says a smaller page may fit when the content uses under a quarter of this one. Memory opens the Memory view.
The sample scene
The Collector's Study is a tea corner in a small study, built from CC0 props and materials.
It comes with the tool, in a version for each render pipeline:
| Pipeline | Folder | Shipped as |
|---|---|---|
| Built-in | Samples/Collector's Study/ | a folder |
| URP | Samples/Collector's Study URP/ | a package beside it, imported by the button |
| HDRP | Samples/Collector's Study HDRP/ | a package beside it, imported by the button |
The URP and HDRP versions use the same props and textures, with materials, lighting and an atlas set up for that pipeline's Lit shader. In URP, the tea light casts its shadow only when your URP asset has Lighting > Additional Lights > Cast Shadows on. Each atlas (Tea Service Atlas) and merge group (Tea Service) is declared but not generated, so you can try the whole workflow in two minutes. The Atlases tab lists a sample's atlas only while that sample's scene is open, so it stays out of your own work.
- On the Home tab, in the Learn row, click Show sample. In a URP or HDRP project the button first reads Import sample and brings in that pipeline's version. The scene is highlighted in the Project window. Nothing is opened.
- Double-click the scene to open it.
- Generate & Apply the atlas.
- Combine the group.
- Open the Build Check tab.
Use this existing atlas and group: their members already belong to them. The sample's README.md lists the steps and the credits.
Tip: Don't need the sample? Delete the
Samplesfolder inside the tool's folder. Nothing else uses it. An update of the tool brings it back.
Note: Delete the
Samplesfolder only after restoring/separating its objects and checking that none of your other assets or scenes references it.
Suggestions
Find under Suggestions on the Home tab looks through the open scenes and proposes atlases and merge groups. It does not read any texture or change anything.
Proposed atlases are materials with the same shader and rendering mode whose values can share one material.
- Each proposal is planned like a real atlas. Members the atlas would leave out are left out of the proposal.
- It is planned with Fit to page on the smallest page, from 1024 to 4096, that keeps the detail Unity shows now.
- When even 4096 cannot, the summary says how far the textures are scaled and the least detail any texture set keeps.
- A smaller Max Size on the generated maps lowers memory afterwards (see the Memory view). Detail lost in the atlas cannot come back.
- A material whose values differ from the others (a floor with its own smoothness, for example) starts a proposal of its own.
- Opaque, cutout and transparent proposals are named apart, for example Standard (Metallic) Cutout Atlas.
Proposed merge groups are four or more nearby renderers with the same materials and lightmap that pass the checks in What can be merged.
- Nearby means a neighbourhood at most 16 m on each side.
- A prop, meaning an object and its children, stays in one proposal when it fits in a neighbourhood.
- Each proposal is named after the props in it (Stove Group, or Stove and 2 more Group).
- When Unity 6's GPU Resident Drawer is on, copies of one mesh and material are not proposed. The drawer already draws them together.
What you can do with a proposal:
- Select selects its renderers in the scene and frames them, so you can see what it would combine.
- Create makes the atlas or group and opens it. An atlas is created, not generated: check it and click Generate & Apply.
Material slots already in an enabled atlas are not proposed for another atlas, and renderers already in a merge group are not proposed for another group.
Your first atlas
An atlas puts the textures of several materials onto shared pages, so the members can use one material.
Members are material slots of renderers. A renderer with two materials has two slots.
- Pick the props. In the Hierarchy, select a few props that use the same kind of material, for example Unity Standard. Children are included.
- Create the atlas. In the Atlases tab, click New atlas from selection.
- The atlas is created in
Assets/KitOptimizer/Atlases/and named after the selected object (for example Table Atlas). - Every material slot of the selected renderers becomes a member, unless another enabled atlas already owns it.
- The atlas is created in
- Check the settings in the Setup view. They are described in Atlas settings below.
- Compare layouts (optional, (Advanced)). Click Compare under Layout comparison. It plans the members with every pack mode, without reading or writing textures, and shows how much space each would use.
- Generate & Apply. Click the large Generate & Apply button.
- The tool reads your original texture files, packs the islands and writes new atlas textures, meshes and a material into
Assets/KitOptimizer/Generated/<atlas name>/. - It then shows them on every member.
- A progress bar shows each stage. Cancel takes effect at the next stage, and then the previous output and your scenes stay as they were.
- When it is done, the status card turns green for a moment and says how many renderers now show the atlas.
- The card then shows Output: Generated, current, the page use and the texture memory before and after.
- The tool reads your original texture files, packs the islands and writes new atlas textures, meshes and a material into
- Compare. Look in the Scene view, or open the Gallery view.
- Restore the originals if you want to go back. Click Restore originals. The generated output is kept, so Apply can show it again. Undo (Ctrl+Z) works for both.
Tip: To do step 5 in two parts, use Generate (make the output) and Apply (show it) below the large button.
Important: If restoration is refused, keep the output and recovery records and follow Undo, restore and disable.
Atlas settings
Resolution is the atlas page size: 256 to 8192 texels square (default 2048).
- The atlas is always packed on this page. When everything fits, texels are copied exactly.
- When it does not fit, every texture set is scaled down by the same factor until it fits. Each set is resampled once, from the original files.
- After generating, a line under Resolution says how far it was scaled and which page keeps every texel, for example Every texel stays exact at 4096×4096. A Use 4096 button switches to that page.
- Texture sets can end up with less detail than Unity shows them at now (their import Max Size). A note then lists them with how much each keeps per side.
(Advanced) Padding is the number of extra texels copied around each island: 0 to 32 (default 4). It keeps mipmaps clean.
(Advanced) Thorough packing (on by default) searches harder for a tight layout. It is slower on very large atlases.
(Advanced) Rotate regions to fit (off by default) lets the packer place a region flipped across its diagonal when that packs tighter.
- This helps, for example, a long, thin strip that would otherwise not fit.
- The render does not change. Texels are still copied exactly, and the meshes keep their tangents, so normal maps read the same.
- It is available with the built-in shader profiles. Generic and custom profiles cannot use it, because their shader may read directions from the UVs.
(Advanced) Tiled textures (default Leave out) lets members whose UVs repeat the texture join the atlas, such as a tiled floor or trim.
- Up to 2, 4 or 8 repeats across and up are copied tile by tile, exactly, and look the same.
- Every repeat takes its own room on the page. A floor tiled 4 times needs 16 times its texture's area.
(Advanced) Detail sets how much detail the atlas keeps.
- Fit to page is the default for new atlases. It works as described under Resolution above.
- Full (exact texels) never scales. Content that does not fit is refused instead (see When the content does not fit).
- 1/2, 1/4 and 1/8 per axis reduce every texture set by that much.
More settings are listed in Atlases tab: Setup view.
Copies, moves and prefabs
Copies of members made after applying (duplicated, pasted, or placed from a prefab made of one) show the atlas too.
- Apply, Generate and Restore originals add them to the atlas, with the originals of the member they were copied from. They then stay up to date and go back with the rest.
- Until then, the Build Check lists them.
A member moved to another open scene takes its atlas record with it, so its originals are kept when you save. (A scene file cannot refer to objects in another scene.)
Members can be prefab instances. Applying a member's overrides to its prefab (Overrides > Apply All) does not carry the atlas output, or a combined member's hidden renderer, into the prefab asset.
- The asset keeps its own mesh, materials and enabled renderer for its other instances. Only the member keeps the change.
- The Console says so.
Changed materials. If you change the material of a slot that shows the atlas, the Build Check reports it. Apply shows the atlas there again. Changes to slots the atlas does not use are kept when you generate again or restore.
Excluded members and conflicts
If a member cannot be atlased, it keeps its original material and is marked excluded in the member list. Hover over the word to see why.
Problems that stop generation altogether are listed in red under the Generate and Apply buttons. An example is members whose material values disagree.
Texture sets and pack modes
Members whose materials use exactly the same textures, and read them the same way, form one texture set.
- A texture set's texels are stored once in the atlas, however many members use it.
- Sets are never mixed: islands are grouped only within one set.
(Advanced) After the first generation, the Texture sets section lists every set with its pack mode:
| Pack mode | What it does |
|---|---|
| Repack Islands (default) | Moves each island (or group of overlapping islands) separately, for the tightest fit. |
| Keep Layout | Moves all islands of the set together, keeping their existing arrangement. A carefully authored layout can beat repacking, because every repacked island needs its own margin. |
| Keep Whole Texture | Copies the whole original texture as one block. |
| Keep Whole Texture Cropped | Copies the used part of the original texture as one block, cropping unused borders. |
| Original | Leaves the set out of the atlas; its members keep their original materials. |
A per-set Detail setting next to the mode overrides the atlas-wide detail for that set. Changes take effect on the next Generate.
Keeping outputs up to date
Each atlas records a fingerprint of everything it was generated from: members, materials, texture files, meshes, settings, island rules, the output shader template and the tool version.
When any of them changes:
- the Setup view shows Output: Stale (members, materials or settings changed since it was generated),
- its badge reads Stale,
- and the Build Check lists the atlas.
Click Generate again. Renderers that show the atlas switch to the new output after successful generation.
The previous version is retained for Undo. Older versions are removed only when no retained reference needs them.
Important: A failed or cancelled generation does not authorize manually deleting the current output or recovery records.
When the content does not fit
With Detail at Fit to page (the default for new atlases), content that does not fit is scaled down to fit and reported. See Atlas settings.
This section is about Full (exact texels), and about atlases made before Fit to page existed. In those, if the members do not fit on one page at the chosen resolution:
- nothing is generated,
- and nothing is shrunk, dropped or spread over extra pages without your say.
A yellow box explains this and offers three choices. None of them changes the atlas until you click its final button.
- Find a page that fits. Plans the members on larger pages, without reading textures, and offers the smallest that works. Click Use 4096x4096 (for example), then Generate.
- Propose a split. Groups whole texture sets into several atlases that each fit on the current page. Click Split into N atlases to move the members into the new atlases, then generate each one. Every member ends up in exactly one atlas, and each atlas still copies texels exactly.
- Reduce detail. Set Detail to 1/2, 1/4 or 1/8 per axis for the whole atlas, or for single texture sets under Texture sets.
- The chosen sets are resampled from the original files (never from an earlier output) before packing.
- The generation notes say which sets were reduced.
- The Setup view's Detail line reports that some maps were resampled.
Maps of different sizes
A texture set has a reference map. For Standard materials it is the albedo.
The set's other maps, such as the normal or metallic map, must have the same size to be copied exactly. A member whose map has a different size keeps its original material, with a reason.
Turn on Resample mismatched maps to resample such maps to the reference size instead. This is also reported in the generation notes.
Keeping islands apart or together
UV islands are the separate pieces of a mesh's UV layout.
Kit Optimizer finds them for each texture set. It groups islands whose triangles genuinely overlap, so texels that several islands use are stored once. Touching edges and slightly overlapping corners do not count as overlap.
Open the Islands view of an atlas to see this:
- Choose a texture set from the drop-down.
- The view draws the set's islands over its reference texture, coloured by placement. Islands drawn in one colour move together.
- A summary line counts islands, placements, grouped overlaps, slight overlaps and mirrored islands.
- Click an island to select it. Click again to cycle through islands that overlap there, and Shift-click to add more.
- Choose a rule (Keep together and Keep apart need two or more islands selected):
- Keep together places the selected islands as one unit, keeping their arrangement, even though they do not overlap.
- Keep apart stops the selected islands from being joined by their overlap. Each one then stores its own copy of the shared texels. That costs space but lets them move independently.
- Remove their rules removes rules from the selected islands.
- Generate the atlas, then compare the result in the Gallery.
Slight overlaps. Islands that overlap only slightly (below the overlap threshold) are joined by dotted amber lines and listed under Slight overlaps, so you can check them.
Island rules lists every rule of the atlas with a Remove button.
- A rule on islands of another texture set reads "(another texture set, or no longer present)".
- A rule on a mesh that appears in several texture sets applies in each of them.
- A rule whose triangles changed since it was made (the mesh was edited or re-imported) is ignored with a note. Check the islands and set it again.
- A rule that no longer matches the members is reported and skipped.
How rules work:
- Rules only matter for sets in Repack Islands mode. Other modes keep the layout as one block.
- Rules are stored in the atlas by mesh asset, so they survive renaming objects.
- Grouping never changes what is sampled. Every placement copies its own source texels, so rules only decide what is stored once and what moves together.
Shader profiles and output shaders
A shader profile has two halves, both edited in the atlas's Output view (Advanced):
- The input profile describes how the members' materials are read: which texture properties are atlased, what a member without a texture contributes, and which values must agree.
- The output decides which shader the atlas material uses and which generated textures feed it.
Input profiles
| Pipeline | Members' shader | Profile |
|---|---|---|
| Built-in | Standard, and lightmapper variants of it with the same properties | Standard (Metallic) |
| Built-in | Standard (Specular setup), and lightmapper variants of it | Standard (Specular setup) |
| Built-in | Autodesk Interactive (roughness maps) | Autodesk Interactive |
| Built-in | Legacy Diffuse and Bumped Diffuse, opaque or cutout | Legacy Diffuse |
| Built-in | Legacy Specular and Bumped Specular | Legacy Specular |
| Built-in | Legacy Self-Illumin Diffuse and Bumped Diffuse | Legacy Self-Illumin |
| Built-in | Legacy VertexLit | Legacy VertexLit |
| Built-in | Mobile Diffuse, Bumped Diffuse, Bumped Specular, VertexLit and Unlit; Unlit/Texture and Unlit/Transparent Cutout | Mobile and Unlit (texture) |
| Built-in | A third-party lightmapper's simple vertex-lightmapped shader | Simple Vertex Lightmapped |
| URP | Lit and Complex Lit, metallic workflow | URP Lit (Metallic) |
| URP | Lit and Complex Lit, specular workflow | URP Lit (Specular) |
| URP | Simple Lit, with or without a specular map | URP Simple Lit |
| URP | Baked Lit | URP Baked Lit |
| URP | Unlit | URP Unlit |
| HDRP | Lit and LitTessellation (every material type; members of different types go to different atlases) | HDRP Lit |
| HDRP | Unlit | HDRP Unlit |
| Any | Any other shader | A new generic profile (see below) |
A newly created generic profile starts with Every other value must match enabled. Existing saved profiles keep their own policy.
The Input profile menu lists the profiles for this project's render pipeline first. The others are greyed out, since their materials would not draw here.
A new atlas starts with the pipeline's main profile. It switches to the one its members need when you add them.
Editing a profile. Click Edit a copy… to make the project's own editable copy of a built-in profile, for example to ignore a value that members may differ in. In a generic profile you can set:
- the source shaders,
- the reference slot,
- the UV transform property,
- the MonoSH keyword,
- the atlased slots,
- and the values that must match or can be ignored.
After an upgrade. When upgrading an existing atlas or loading a saved generic profile, review its Input profile in the Output view.
- Earlier generic profiles may have Every other value must match turned off.
- Enable it explicitly when the intended policy is that every value the profile does not handle must agree.
- Also review the match and ignore lists, then regenerate and compare the result.
- Saved profiles are not silently rewritten, because an unchecked option may be an intentional custom policy.
- If you share the change through the library, save a new profile version and explicitly update each atlas that should use it.
Keeping the members' shader
Under Output: the atlas material, Members' shader is the default.
It makes the atlas material a controlled copy of one member's material, with the atlas textures in the same properties. Render mode, lightmapping settings and other non-texture values are kept.
Using another shader
Choose Another shader to feed the atlas into any installed shader:
- Pick the Output shader. A template material for it is created in
Assets/KitOptimizer/Templates/. The members' materials are never edited. - Set up the template. It is shown with the shader's own inspector. Set everything there except the generated textures: colours, toggles, render mode and so on. Each generated material is a copy of the template.
- Bind the textures. Under Generated textures, every texture the atlas will produce is shown as a small preview tile.
- Drag a tile onto a texture slot of the template, or pick it per property under Texture properties.
- Auto-fill suggests bindings from common property names and labels. Check its result.
- Clear removes all bindings.
- Add packed textures if the shader needs them. For shaders that expect packed masks, the generated textures already include common packings made from the input maps: roughness, smoothness, metallic, ORM and a mask map.
- Click New packed texture… to define your own channel combination.
- Colour (sRGB) and data (linear) encodings are checked, so values are never moved between channels that store them differently.
- Generate. Packed channels are copied texel for texel in the same layout.
The preview tiles are placeholder assets in Assets/KitOptimizer/Previews/. They let custom inspectors switch on the features a texture enables. Generated materials never keep them, and they never go into builds.
Features to check. Review these lists before applying:
- Output shader features to check flags features of the chosen shader that atlasing may affect, such as animated UVs, extra UV channels, detail layers or projections.
- Member shader features to check, under the input profile, does the same for the members' shader. It flags only the features a member actually uses (a texture assigned, or a value changed from the shader's default). The others are named in one line below it.
Saving and reusing profiles
You need a library folder for this (see The shared library).
- Type a name under Save as.
- Click Save new profile.
Profiles are saved in the library as numbered versions, so they can be loaded into atlases in any project. Saving again under the same name with Save new version adds a version.
An atlas keeps its own copy of the profile. It only changes when you load or update it:
- When the library has a newer version, the Output view offers Update to version N.
- It warns you if the atlas's copy was changed locally first.
Baking tints and strengths
By default, members must agree on values such as colour tints. Otherwise generation stops with a list of conflicts.
Turn on Bake tints and strengths in the Setup view to multiply each member's tints and strengths into its own texels instead. Members that differ only in those values then share one material and still look the same.
- What is baked: the colour tint, the emission colour (Standard and URP), the smoothness scale, the specular colour (URP Simple Lit and HDRP Lit) and HDRP Lit's mask strengths (subsurface, transmission, anisotropy, iridescence and coat).
- The smoothness scale is Standard's Smoothness under a metallic or specular map, and URP Lit's Smoothness under its metallic map.
- Baked texels are rounded to 8 bits. In EXR and 16-bit maps they are kept as floats.
- A value above 1, such as an HDR emission colour, becomes the atlas material's value, and the other members are baked relative to it.
- A material whose smoothness comes from its albedo's alpha keeps its smoothness value as a value the members must share, because it cannot be baked into that alpha. Legacy VertexLit's tint lights the vertices, so it must match too.
When generation stops on values that baking would resolve, the Setup view says so with a Bake these values button.
Each conflict also has Select material, which selects the materials it names. Use it when you would rather change a value than bake it.
Directional lightmaps and the output shader
MonoSH is a compact directional lightmap mode that some third-party lightmappers offer. Shaders mark it with a keyword and must decode it.
If members are lit with MonoSH lightmaps and the chosen output shader is not known to decode MonoSH, generation is refused.
The Lighting section of the Output view explains which members use MonoSH and whether the template decodes it. Then either:
- switch the template to MonoSH (with the shader's own MonoSH option), or
- tick Accept the lighting change for this atlas if you are sure.
Decoding MonoSH through a shader other than the members' own is reported as untested.
The lightmapper's other decoding modes are guarded the same way: SH and RNM directional lightmaps, vertex lightmaps, and bicubic sampling. When members use one and the output template does not enable the same keyword, generation is refused until you enable it or accept the lighting change.
Merging objects
A merge group combines compatible objects into one renderer, with one submesh per distinct material. Combining is manual and reversible.
- It can reduce draw calls when members reuse materials.
- Combining objects with different materials alone does not make them one draw call.
- Atlas compatible materials first if you want to reduce material count too.
Combining a group
- Select the objects. Select a few nearby, static objects. They may use different materials, provided the group passes the checks below. Atlas compatible materials first if you also want fewer distinct materials.
- Create the group. In the Merge Groups tab, click New group from selection.
- Read the State line and any warnings.
- Spread shows how far apart the members are. A combined renderer is culled as one object, so widely spread groups can cost more than they save. A warning appears above 40 m.
- A warning appears when members sit in the areas of different reflection probes. The combined renderer takes its reflections from one place, so group members by room (or set their Reflection Probes to Off).
- Click Combine. A combined object appears under
[Kit Optimizer Combined], and the members' renderers are disabled. Members keep their colliders, scripts and transforms. - To undo it, click Separate. This shows the members again and removes the combined object.
Regenerate rebuilds a combined group from its members, for example after you moved one.
You can also select the combined object in the Hierarchy. Its inspector names the group and has Select members, Open group and Separate buttons. Edit the members, not the combined object, then regenerate.
Important: A build removes a combined member's MeshRenderer and MeshFilter (Play mode still has them). A script on a member must not use them at run time. The group's status warns when members have scripts.
What can be merged
Every member must be:
- an active, enabled mesh renderer with opaque or cutout materials,
- in the group's scene,
- made of triangles,
- with a material in every slot, and as many slots as its mesh has submeshes.
Refused, because they move, animate or sort independently:
- objects with a Rigidbody, Rigidbody 2D, Character Controller, NavMesh Agent or Obstacle, Animator, Animation, Articulation Body, Playable Director, Spline Animate or a constraint, on themselves or a parent;
- objects a LOD group lists, wherever they are in the hierarchy;
- skinned meshes;
- transparent materials.
Also refused:
- materials whose shader disables batching, because it needs each object's own coordinate system;
- objects tagged EditorOnly, or under an object that is. Builds leave them out, so their geometry must not ship in a combined renderer.
Members may use different materials, but must agree on:
- lightmap, shadow, probe, layer, rendering layer, sorting, motion vector, dynamic occlusion and static settings;
- their NavMesh area.
The combined renderer takes these settings. Changing any of them on the members makes the group stale.
When members differ only in renderer settings, Make settings match gives every member the settings most members have, in one Undo step. Bake the lighting again if shadow, probe or static settings changed.
Light probes. Blend Probes members can combine in three cases:
- with one valid shared Anchor Override;
- without baked probes;
- or when the checked diffuse probe light and mixed-light occlusion at the members and the combined mesh agree within the probe-signal tolerance.
A group that fails this check is refused. Use one shared anchor or keep it separate. Proxy volumes and custom probe lighting are not supported.
This tolerance applies before material multiplication, exposure and tone mapping. It is not a bound on final rendered pixels.
Every refusal comes with the exact reason, shown in the member list and in the Scene view mode.
Per-object light limits. A combined object is lit as one object. The limit is Quality > Pixel Light Count in the Built-in Render Pipeline, and the pipeline asset's Per Object Limit in URP.
When more realtime or mixed lights reach the combined object than that limit, and more than reach any member alone, the group says so. The extra lights fall back to per-vertex or ambient light. Group members by area, bake those lights, or raise the limit.
Unity 6's GPU Resident Drawer. When the render pipeline has it on, it already draws renderers that share a mesh and material together, and culls each one.
- Combining such copies makes one mesh that is culled as a whole, so a group that repeats a mesh says so. Leave those members out to keep their culling.
- Merging different meshes still reduces renderers, and atlasing still reduces materials.
Lightmapped members
Lightmapped members keep their baked lighting. Each member's lightmap scale and offset are folded into the combined mesh's lightmap UVs, and the combined renderer shows the members' lightmap.
Unity's built-in lightmapper. Unity's lighting data cannot list a renderer it did not bake. Kit Optimizer therefore gives the combined renderer its lightmap again whenever Unity resets it:
- when the scene opens,
- when the lighting data changes,
- and when Play mode loads the scene.
In builds, the combined renderer gets its lightmap in the build copy of the scene. Tests check this by baking real scenes and comparing the rendered result with the separate members.
Third-party lightmappers with their own lightmap storage. When such a lightmapper is installed, the combined renderer is registered in its per-scene lightmap storage, which then applies the lightmap itself. MonoSH directional lightmaps are supported.
Keep these rules in mind.
Members must share one lightmap. The lightmapper may put nearby objects in different lightmaps. Such a group says how many and shows Split by lightmap:
- The largest lightmap set stays in the original group, even if it has only one member.
- Each other set with two or more members becomes a new group.
- Singletons outside the retained group leave it.
- Undo reverses the split.
To keep them in one group instead, bake with a larger maximum lightmap size. If your lightmapper has lightmap groups, you can instead put the objects you intend to merge in one group. Then bake again.
Bakes are handled for you. A bake can be Generate Lighting with Unity's lightmapper, or a full bake through the third-party integration. When one starts, combined groups are separated first and combined again when the bake ends. The members are baked individually, and the combined mesh picks up the new lighting.
- A cancelled Unity bake keeps the previous lighting, and the groups are combined again from it.
- With the third-party integration, a cancelled or failed bake leaves the groups separated. The Merge Groups tab and Build Check offer to combine them again.
- The same happens with a bake rendered on another computer, which reports no finish to this editor.
Not handled automatically:
- Unity's Auto Generate previews. Separating groups would restart the preview, so use Generate Lighting for the bake you keep.
- The third-party lightmapper's bakes of selected groups only.
After such a bake while groups were combined, the Home tab and Build Check say that the combined objects kept their earlier lighting. A full bake updates them.
Light probe bakes need nothing: probe-lit combined objects read the new probes.
Supported modes:
- Unity's lightmaps in Non-Directional and Directional mode.
- The third-party integration's lightmaps in every mode:
- MonoSH, SH and RNM. Their extra maps, which the lightmapper sets on each renderer, are carried to the combined renderer.
- Vertex lighting. The members' vertex light is joined into one in the combined mesh's vertex order.
- Other material property blocks are refused.
Note: Kit Optimizer never starts a bake by itself.
The shared library
The library is an ordinary folder on your computer. You choose it once, and every project you open on that computer uses it.
- It must be outside any Unity project.
- A synced or backed-up folder works well.
To get started:
- Open the Library tab and click Choose library folder…. To choose another folder later, click Folder… in the tab's header.
- Import some assets (see below). You choose a pack for each import, or create a new one. Mark it External pack for bought or downloaded content, as opposed to your own work.
- Browse with All assets, My assets, External, a pack or a tag in the sidebar, or type in the search field. The slider sets the thumbnail size.
- Double-click an asset, or drag it into the Scene view or Hierarchy, to place it. The first time a pack is used in a project, its files are copied into
Assets/KitOptimizer/Library/with their original GUIDs.
Selecting an asset shows:
- its pack, kind and revision;
- its Tags (comma-separated; edit them in place);
- anything it needs that the library does not copy (scripts, packages);
- which revision this project uses;
- (Advanced) its prepared version.
Using the library from several projects
Several projects can use the library at the same time.
- Every change is made to the pack as it is on disk, one editor at a time, so no project overwrites what another imported.
- Click Refresh to see what other projects added.
- A pack whose file cannot be read is left out and named, and the rest of the library stays usable. This happens when a sync conflict damaged it, or when a newer version of Kit Optimizer saved it.
- When the library folder is not available, for example on an unplugged drive, the tab says so instead of asking you to choose a folder.
Tip: Across computers that share a synced folder, the sync tool can still make a conflicted copy when two computers change the same pack before syncing. Import into a pack on one computer at a time.
Interrupted placement and recovery
Before a library placement or pack update changes project files, Kit Optimizer writes a recovery record. It also copies the files it may replace. Both go under the project's Library/WorldPropManager/PlacementTransactions/ folder, which is separate from your shared asset library.
Automatic recovery. After an editor interruption, recovery runs automatically once the editor has finished compiling/importing. It runs again before another placement or update.
- A pending operation is rolled back only when its project, record, backup files and affected project files can be verified.
- An operation recorded as completed needs only recovery-file cleanup.
When recovery is refused. If the Console reports Library placement recovery, or says an earlier placement still needs recovery, further placements are blocked.
Safe recovery can be prevented by a damaged or newer record, a missing backup, a changed project file or a linked path. The tool then keeps the evidence instead of guessing what to overwrite. Follow these steps:
- Stop placement/update attempts and keep the reported project files as they are.
- Back up the entire
Library/WorldPropManager/PlacementTransactions/directory. Include every transaction subfolder,transaction.jsonand all.blobbackup files. Keep the current affected assets, their.metafiles andAssets/KitOptimizer/Library/LibraryState.assetwith that project backup. - Read the first recovery error. Restore a known matching project backup, or resolve the specifically identified access problem. Do not edit the journal or delete it merely to bypass the refusal.
- Reopen the project to retry automatic recovery.
- If the error remains, use Help > Report a Problem and send support the exact error and transaction path. Keep the backup files locally. Send assets or backup blobs only if support asks for them.
Important: Deleting Unity's
Libraryfolder also deletes these placement backups. Do not clear it as a troubleshooting step while placement recovery is pending. Preserve the complete transaction directory before any cache reset, project move or manual repair. Automatic recovery cannot recreate missing backup bytes.
Importing project assets
Select prefabs, models, materials or textures in the Project window and choose Import > Selected project assets. You can also drag them onto the Library tab.
- Dependencies come along. Everything they depend on is imported with them, byte for byte with their
.metafiles, so import settings and GUIDs are kept. - Shaders and Shader Graphs are copied too. They come with the files they include (by a path relative to the shader), and with the sub graphs and function files a graph uses. Materials then keep drawing in projects that never had them.
- A shader that includes a file by its
Assets/path is reported. Placed copies are in another folder, so change it to a relative path. - Scripts and package files are not copied. They are recorded as requirements, and reported when a project that uses the asset does not have them.
Editing placed assets. Assets placed from the library can be edited and imported back into their pack. Their files keep their paths in the pack.
- Files placed from a prepared version are stored with the pack's original import settings, not the smaller prepared ones.
- A file that came from another pack is copied into the new pack with the same GUID, and the import says so. A project that uses both packs can have only one version of it.
Importing files from outside the project
Choose Import > File from disk… or Import > Folder from disk…. You can also drag files and folders from your file browser (Explorer, Finder) onto the Library tab.
The files are copied into a temporary staging folder, imported by Unity and stored in the library. The staging folder is then removed. Your source files are only read.
Importing the same files again keeps their GUIDs. Changed files create a new revision.
- Scripts and plugins are skipped and listed (
.cs,.dll,.asmdefand similar). Unity would compile and load them into your project, and the library stores content, not code. - Shaders are imported and stored with the materials that use them.
- Missing references are reported. If a file refers to files that were not part of the import, such as materials kept in a sibling folder, the placed asset would be missing them. Import that folder too.
- A folder that contains the open project cannot be imported.
Models in any format Unity imports natively (FBX, OBJ with its .mtl, DAE, 3DS, DXF) can be imported this way.
Substance 3D Painter exports
Substance 3D Painter exports are recognised by their file names.
Drag the export folder together with its model onto the tab, for example Crate and Crate_low.fbx. They become one model with a material per texture set, assigned to the model's slots by name.
The material is made for the project's render pipeline: Standard in the built-in pipeline, URP Lit in URP, HDRP Lit in HDRP.
Presets and map types:
- The Unity export presets map directly: Standard (Metallic) and Standard (Specular), and the URP and HDRP presets (
BaseMap,MaskMap). - Specular sets get a specular material: Standard (Specular setup), URP Lit in its Specular workflow, or HDRP Lit's Specular Color type. A specular set has a
Specularcolour map withGlossiness,SmoothnessorRoughness, and no metallic map. The specular and glossiness maps are combined exactly into aSpecularSmoothnessmap where the shader needs one. - An ORM map (Unreal-style presets) is converted exactly into MetallicSmoothness and Occlusion maps. The ORM file is kept too.
- In HDRP, the metallic, occlusion and smoothness maps (separate, MetallicSmoothness or ORM) are combined exactly into the mask map HDRP Lit reads. A map the set lacks takes HDRP's neutral value: metallic 0, occlusion 1, smoothness 0.5.
- Separate roughness (or smoothness) and metallic maps are converted exactly into a MetallicSmoothness map. A metallic map without a roughness map is reported, not converted.
Normal maps. The normal-map direction (OpenGL or DirectX) is read from the file name when it says so, or measured from the map itself.
- DirectX maps get Unity's lossless Flip Green Channel import setting.
- Maps that cannot be decided are imported as OpenGL, with a warning.
Opacity. An opacity map next to a base colour without alpha is combined exactly into an AlbedoTransparency map.
- The material is set to Cutout if at least 97% of the opacity's texels are fully transparent or fully opaque (alpha within 8 of 0 or 255). Foliage whose leaves only have anti-aliased edges is an example.
- Otherwise it is set to Fade, as with glass or feathered edges.
- A base colour that has its own alpha is used as it is, with the same choice.
Other maps and formats:
- When a map was exported in several formats, PNG is preferred. The other copies are kept as textures named by their format.
- Height, specular level (
spec) and translucency maps are kept as textures but not assigned to the material. - Painter project files (
.spp) are not read. - PNG, TGA, JPG, TIFF, PSD, BMP and GIF maps are converted exactly. TIFF, PSD, BMP and GIF are read through Unity's own importer, with PSD layers flattened as Unity shows them.
- A needed map that exists only as EXR or HDR is reported with what is missing. It is never quantised.
- Maps of different sizes are never resampled to match.
PBR texture downloads
PBR texture downloads that use the common naming are recognised too. Their maps are named {asset}_{map}_{resolution}: a map name such as diff, nor_gl, arm, rough, metal or alpha, followed by a resolution suffix like _1k.
Download a model as FBX with its textures, for example chair_01_1k.fbx and its textures folder. Then drag the folder onto the tab.
| Map name | Becomes |
|---|---|
diff, col | Base colour (albedo) |
nor_gl, nor_dx | Normal map; nor_dx gets Unity's Flip Green Channel import setting |
arm | MetallicSmoothness and Occlusion maps, converted exactly (as from an ORM map) |
rough, metal | A MetallicSmoothness map, converted exactly |
ao | Occlusion |
alpha | Combined with the base colour into an AlbedoTransparency map |
disp, bump, spec, translucent | Kept as textures, not assigned |
How names are read:
- The resolution token (
_1kto_16k) is ignored. - The short map names count only before it, so ordinary names such as
Robot_Arm.pngare not taken for maps. - When one map comes in several files, the choice never depends on file order. The order of preference is PNG or TGA, then TIFF or PSD, then JPG or BMP, then EXR, then the higher resolution.
Tip: Download each asset at one resolution, because maps of different sizes are not combined. Keep all of a material's maps in one folder: maps are matched per folder.
Packs and render pipelines
A pack holds the materials as they were made in the project that imported it. Placed in a project with another render pipeline, they render pink, and placing them says so.
- Standard materials can be converted with Unity's converter: Window > Rendering > Render Pipeline Converter for URP, the HDRP Wizard for HDRP.
- URP or HDRP materials need the pipeline's shader, which the placement names as missing.
- Converted copies count as edited in that project, so a later update of the pack leaves them as they are.
- To keep one pack per pipeline, import the files again from a project with that pipeline into a new pack.
- A project with a custom render pipeline gets Standard materials.
Capturing scene objects
To store a prop exactly as you configured it in a scene, select it in the Hierarchy and choose Import > Selected scene object. You can also drag it onto the Library tab.
Its children are included, and the scene object is not changed.
- A prefab instance becomes a prefab variant, so your overrides are kept.
- Renderers that show atlas output are captured with their original meshes and materials. Project outputs never enter the library.
- References a prefab cannot keep (other scene objects, scene-only assets) are listed first, and you decide whether to capture anyway.
- Combined merge renderers cannot be captured.
Capturing again under the same asset name makes a new revision of the same asset.
Revisions and updates
Every import that changes something creates a new pack revision. Unchanged files are stored once.
A project stays on the revision it first placed until you click Update to revision N in the asset details.
- Updating replaces only files that came from the pack. Files you edited in the project are never overwritten.
- A file the project already had before the pack was first placed (with the same GUID and content) is not updated either, because other content may use it. The update says when the new revision has a different version of it.
- Atlases built from changed files become stale.
Collisions. When placing, a file whose GUID already exists in the project with identical content is reused. A GUID or path that is taken by different content is a collision, and nothing is written.
Prepared versions
A prepared version is a lighter way to place a pack: the same source files, imported with a smaller maximum texture size. The pixels in the files are identical. Only the import setting differs, so switching is lossless.
- To make one (Advanced), choose a size (256 to 4096) next to Prepared version in the asset details and click Prepare.
- To have one made on every import of a pack, tick Prepare on import in the import dialog. It is off by default.
- To switch in a project, use Use prepared version and Use original version.
- Prefer prepared versions above the assets places the prepared version when a pack is first used in a project.
Atlases are always generated from the full-size source files, whichever version is placed.
Before you build: the build check
The Build Check tab compares the open scenes with what you declared. Each issue is marked Blocker or Review.
| Issue | Severity | Fixes offered |
|---|---|---|
| Atlas enabled but not generated | Review | Generate and apply, Use originals (disable atlas) |
| Atlas output out of date | Review | Generate and apply, Use originals (disable atlas) |
| Some members still show their original materials | Review | Apply, Use originals (disable atlas) |
| Disabled atlas whose output is still showing | Review (Blocker if that output was deleted) | Use originals (disable atlas) |
| Copies of members show the atlas without being members | Review | Apply (adds them) |
| Members changed after applying (another mesh or material, or a prefab revert) | Review | Apply, Use originals (disable atlas) |
| Renderers still show the output of an atlas that was deleted | Review (Blocker if that output is gone too) | Restore originals |
| Members show generated assets that were deleted | Blocker | Generate and apply, Use originals (disable atlas) |
| A slot is claimed by two enabled atlases | Blocker | Use originals (disable atlas), or open the atlases and move or remove the slot |
| Merge group out of date | Review | Combine again, Separate |
| Merge group left separated by an unfinished bake | Review | Combine again, Keep separated |
| Combined renderer deleted, its mesh asset or a material missing, or its lightmap registration lost | Blocker | Combine again, Separate |
| Combined object tagged EditorOnly, or moved under an EditorOnly object (builds leave it out) | Blocker | Separate, or move it out |
| Combined object inactive or its renderer disabled | Review | Separate |
| A member was deleted while combined (the combined mesh still draws it) | Blocker | Combine again (drops it), Separate; only Separate when one member is left |
| A member changed after combining so it can no longer be combined (deactivated, tagged EditorOnly, given a Rigidbody…) | Blocker | Separate |
| Members can no longer share one renderer | Blocker | Separate |
| The combined object's list of members is missing or out of date (builds could not safely remove the hidden member renderers) | Blocker | Combine again, Separate |
| A combined object with no combined merge group in the open scenes (for example a copy left after separating) | Blocker | Select it, then delete it |
A scene has more than one [Kit Optimizer] object (objects were moved in from another scene with theirs, or a version control merge kept both); only one is read | Blocker | Join into one object |
The buttons:
- Fix all applies only the fixes that bring outputs up to date with what you declared: it generates, applies and combines again. Choices that change what you declared, such as using originals or separating, are left to you.
- Open jumps to the atlas or group.
- Select selects the scene objects an issue is about, for example a leftover combined object.
- Check again runs the check over the open scenes.
Note: If you cancel a generation's progress bar during Fix all, the remaining fixes are not applied.
Below the summary, the Scene optimisation card shows the open scenes' before and after numbers (see Before and after numbers).
Important: Some versions of a third-party lightmapper do not raise the full-bake events that Kit Optimizer uses to separate merge groups. When such a version is installed, the tab shows a warning. Then separate the groups by hand before baking.
Builds
Before every player build, temporary states end, so the build sees only your declared scene:
- a Scene view mode is exited (restoring your selection),
- and gallery previews are removed.
Then the open scenes are checked.
- Blocker means the build would be missing objects, materials or lighting. The editor asks whether to cancel the build (Cancel build or Build anyway), and opens the Build Check tab if you cancel. In batch mode the build fails with the list.
- Review items are written to the Console, and the build continues.
Important: Scenes in the build that are not open are not checked. Open them, or run the Build Check with each one open, before a release build.
Asset bundles and Addressables. Builds made with the Scriptable Build Pipeline get the same check before they write anything. Blockers in the open scenes stop the build (after asking, in the editor), with the list in the Console. Content builds usually run with few scenes open, so check the rest from the command line (below).
From the command line
Build machines and scripts can run the check without opening the window, with Unity's -batchmode and -executeMethod:
Unity -batchmode -projectPath <project> -executeMethod KitOptimizer.Editor.Build.CommandLine.Check -logFile -
Unity -batchmode -projectPath <project> -executeMethod KitOptimizer.Editor.Build.CommandLine.FixAll -logFile -- Check opens each scene and reports what the Build Check tab would list.
- FixAll also does what Fix all does (generate, apply, combine again) and saves the scenes.
Which scenes. Both check the scenes enabled in Build Settings, one at a time. Or list your own with -koScenes "Assets/A.unity;Assets/B.unity".
Strict mode. Add -koStrict to fail on items to review as well as blockers.
Exit codes. The editor quits with:
| Code | Meaning |
|---|---|
| 0 | Nothing blocks a build. |
| 1 | Issues remain. |
| 2 | The check could not run (for example a missing scene). |
From an open editor. You can call them from an open editor too, for example from your own menu item. They first ask you to save modified scenes, and reopen the scenes you had open when they finish.
What goes into the build
- The
[Kit Optimizer]scene object, which records memberships and originals, is tagged EditorOnly, so Unity removes it from builds. Originals referenced only there are not shipped. - In the build copy of each scene, the renderers of merged members are removed. Their colliders and other components stay. The combined renderer's list of members is removed too.
- Atlas definitions, template materials, preview textures and gallery copies are never referenced by your scenes, so they are not shipped.
- Your build needs no Kit Optimizer scripts at runtime.
Scene modes
Both the Atlases and Merge Groups tabs can edit membership directly in the Scene view. Click Pick in Scene view:
- A panel in the Scene view shows the atlas or group, instructions, the member count and the object under the mouse.
- Click an object to add or remove it. Members are outlined in green, a candidate under the mouse in cyan, and an object that cannot join in red, with the reason.
- In an atlas, Ctrl+click moves an object out of another enabled atlas into this one.
- Isolate shows only members and objects that can join, using Unity's scene isolation. Nothing in the scene is changed.
- Add selected and Remove selected work on the current selection. Select members selects the members.
- Press Esc or click Exit to finish. Your previous selection, tool handles and isolation come back.
The mode also ends when you enter Play mode, change scenes or build. It never changes what is built.
Window reference
Home tab
| Section | What it does |
|---|---|
| Environment | The render pipeline, the lightmapper integration and the shared library folder (details below). |
| Get started | Cards that create an atlas or a merge group from the selection, run the build check, or open the library. |
| This scene | The open scenes' before and after numbers. |
| Suggestions | Find proposes atlases and merge groups for the open scenes; Select shows a proposal's renderers in the scene; Create makes one and opens it (see Suggestions). |
| Learn | Manual and Quick Start open the same files as the Help menu; Show sample highlights the Collector's Study sample's scene for the project's render pipeline in the Project window (Import sample first imports it, in a URP or HDRP project). Below it, Report a problem opens the problem report (see Reporting a problem). |
The Environment section shows:
- Render pipeline: Built-in, URP or HDRP, which the built-in shader profiles cover. Or a custom pipeline, which is not tested; atlases then need a profile you define in Atlases > Output.
- Lightmapper integration, shown only when a third-party lightmapper is installed. Active means combined merge groups keep their baked lighting and are separated for full bakes automatically.
- Shared library folder, with Choose… or Change…. It is optional and used only by the Library tab. Pick a folder outside your projects; every project on this computer shares it. Not found means the drive or share is not connected.
Library tab
| Control | What it does |
|---|---|
| Import | Selected project assets (with their dependencies), Selected scene object (with its children and overrides), Folder from disk… and File from disk…. You can also drag onto the tab. |
| Folder… | Choose another library folder for this computer. |
| Refresh | Reload the library from disk (for example after syncing). |
| Prefer prepared versions (Advanced) | Place prepared versions when a pack is first used in this project. |
| Sidebar | Filter by All assets, My assets, External, kind (models, prefabs, materials, textures, other files; shown when the library holds more than one), pack or tag. |
| Asset details | Tags, requirements, Place in scene, Prepare, Update to revision N, Use prepared version / Use original version. |
Atlases tab: Setup view
| Control | What it does |
|---|---|
| New atlas from selection | Create an atlas with every material slot of the selected renderers. |
| Enabled | Untick to restore the originals and keep the atlas out of builds and build reminders; its setup and outputs are kept. |
| Shader profile, Edit… | The profile in use; Edit… (Advanced) opens the Output view. |
| Resolution; (Advanced) Padding (texels), Thorough packing, Rotate regions to fit | Page size (256 to 8192), margin around islands (0 to 32), how hard to search for a tight layout, and whether regions may be turned to fit (built-in profiles only). After a generation scaled to fit, a line under Resolution names the page that keeps every texel, with a Use N button. |
| Bake tints and strengths | Bake tints and map strengths into texels so members can share one material. |
| (Advanced) Detail | Fit to page (the default: pack on the chosen page, scaling every set by one factor only when needed), Full (exact texels), or 1/2, 1/4 or 1/8 per axis. |
| (Advanced) Tiled textures | Leave out members whose UVs repeat the texture, or copy up to 2, 4 or 8 repeats tile by tile. |
| (Advanced) Resample mismatched maps | Resample maps whose size differs from their set's reference map. |
| (Advanced) Texel density | How much texture detail each object gets per metre of its surface (see Texel density). |
| (Advanced) Texture import | Import settings for the generated textures, through a Texture Import preset (see Texture import). |
| (Advanced) Mask | Off by default. Gives every unique mesh its own flat colour or value (see Mask). |
| Generate & Apply | Make the output and show it on every member, in one click. |
| Generate, Apply, Restore originals | Each step on its own: make the output, show it, or show the originals again. |
| Add selected, Remove selected, Pick in Scene view, Select all; (Advanced) Move selected here, Include all matching | Edit membership. Include all matching adds every slot in the open scenes that uses one of the members' materials. |
| Member list | Each member with its original material and a dot: green when it shows the atlas, grey when it shows its original, amber when the last generation left it out (hover for why). Group: … opens the merge group the member is in. Click a row to select the object; its × removes just that member. A filter appears above lists of more than 8 members. |
| Bin icon (next to the status badge) | Delete the atlas. It asks first and says what happens: members in the open scenes show their originals again, the atlas definition is moved to the Recycle Bin (Trash), and its generated files are kept. |
| (Advanced) Texture sets | Pack mode and detail per set. |
| (Advanced) Layout comparison, Compare | Plan the members under each pack mode without generating. |
| Last generation | When it was generated and by which version, page use, detail, texture memory, the output material and notes; Show files shows the generated folder in the Project window. |
| Atlas list (right-click) | Show in Project or Delete… an atlas. |
Texel density
(Advanced) Texel density sets how much texture detail each object gets per metre of its surface.
- Keep each set's (the default) copies texels exactly, so an object with a larger texture stays sharper.
- Even out brings every texture set down to the least detailed set's texels per metre, so all objects match.
- At most… brings only sets denser than a value down to it.
Sets are resampled once from their originals and never enlarged. Each one that changed is listed under the generation's notes. The range the last generation measured is shown under the setting.
Texture import
(Advanced) Texture import sets the import settings for the generated textures.
- A Texture Import preset (Unity's own preset of a texture's import settings) sets their maximum size, compression, format, mip maps, filtering and per-platform overrides.
- New from output makes a preset from a generated texture and selects it, so you can edit the full import settings in the Inspector.
- Per map gives one map (for example the normal map) its own preset.
- Colour space, texture type and readability stay as the atlas needs them.
- It takes effect on the next Generate.
Mask
(Advanced) Mask is off by default. Make a mask gives every unique mesh its own flat value.
Fill:
- Colours is an ID map: a clearly different colour per mesh, for colour selection in texturing tools.
- Values gives one grey step per mesh (255, 247, 239…), so a shader can pick out one object by testing a range.
Write to:
- a Texture lined up with the atlas (linear, no mip maps, uncompressed unless a Texture import preset says otherwise),
- the generated Mesh: the same value in every vertex, in the Mesh channel you choose (UV channel 3 by default, or vertex colour),
- or both.
Value step: automatic is 1 for meshes (exact, up to 255 meshes) and 8 with a texture.
Stable numbers. Each mesh keeps its number for good. Its colour or value never changes when you generate again, rebake, or add, remove or reorder members.
- Click a colour or value to set your own, and ↺ to go back.
- Or tick several meshes and Set them to one value.
- Copy legend copies every mesh's colour or value, with a test a shader can use.
With a texture, the atlas keeps the islands of different meshes apart, so each has its own texels. Shared texture area is then stored once per mesh, and the notes say so.
Existing mesh data. Generate stops, naming the meshes, when a member's mesh already has data in the mesh channel. Turn on Replace data already there to write it anyway; only the generated meshes change.
Set on material property puts the mask texture on a texture property of the atlas material.
Merge groups keep the mesh values.
Atlases tab: Output view
| Section | What it does |
|---|---|
| Saved profiles | Load a library profile, update to a newer version, save a new profile or version. |
| Input: how members' materials are read | The input profile; Edit a copy… for the project's own version. |
| Output: the atlas material | Members' shader or Another shader, the output shader and its template material. |
| Lighting | Whether members use MonoSH lightmaps and whether the template decodes it. |
| Generated textures | Preview tiles to drag onto the template; New packed texture…. |
| Texture properties | Bindings per property; Auto-fill and Clear. |
| Template material | The output shader's own inspector. |
| Output shader features to check | Shader features that atlasing may affect. |
Atlases tab: Islands view
| Control | What it does |
|---|---|
| Analyse again | Re-plan the members with the current rules (no textures are read). |
| Set drop-down | The texture set to show. |
| Canvas | Click an island to select it, Shift-click for more. |
| Keep together, Keep apart, Remove their rules | Rules for the selected islands. |
| Slight overlaps | Pairs that overlap below the threshold, with Select. |
| Island rules | The atlas's rules, with Remove. |
Atlases tab: Memory view
What the generated maps cost in texture memory, and where to lower it.
Atlasing is for materials and draw calls. The maps it makes are then textures like any other, so you compress and size them as you would any texture.
| Item | What it shows or does |
|---|---|
| Generated maps | Every generated map's texture memory, mip maps included, as Unity imports it for the active build target. |
| Originals they replace | The members' original textures for those maps, counted once each, when the atlas was generated. |
| Maps | Each map's size, format (hover for compression, mip levels and streaming) and memory. Select selects the texture, so the Inspector shows its import settings. |
| What lowers it | Savings worked out for this atlas (see below). |
| Import settings | The atlas's Texture import preset (the same setting as in Setup's advanced settings). Setup goes back to it. |
What lowers it lists:
- the memory at the next smaller Max Size: half the width and height, a quarter of the texels (one platform only with a platform override);
- maps left uncompressed;
- Streaming Mipmaps, with Texture Streaming in the Quality settings.
A mask texture holds exact values, so it stays uncompressed unless your preset says otherwise.
Tip: Generated maps are rewritten on each Generate, so change their import settings through the preset, not on the textures. New from output makes a preset from the current settings and selects it to edit in the Inspector. A changed preset takes effect on the next Generate & Apply.
Atlases tab: Gallery view
| Control | What it does |
|---|---|
| Object drop-down | Whole group or a single object. |
| Compare, Original, Generated | What to show. Compare shows both with linked cameras, side by side or one above the other, whichever shows them larger. |
| Layout: Grid, In a line, As placed | How the objects are arranged. Grid (the default) stands them in rows facing the camera, tallest first, shaped to fill the preview, however far apart they are in the scene. In a line puts them in one row. As placed keeps their scene positions. |
| Spacing | The gap between objects in a grid or line. |
| One of each | Shows each distinct look (mesh and materials) once, named with how many members share it (for example Cup ×4). Untick to show every member. |
| Frame all (Home key) | Frames everything again at the default angle and zoom. The view also opens framed this way each time you come back to it. |
| Drag, scroll wheel | Orbit and zoom. |
| Keys (click the preview first) | Arrows orbit, + and − zoom, Home frames all, Page Up and Page Down choose an object, Esc shows the whole group, and Enter selects the object in the scene. |
| Rebuild | Rebuild the preview copies. |
| Generated textures | The atlas textures with their size, how much of the page is used, and the texture memory before and after; click a texture to select it in the Project window. |
| Atlas resolution, Generate at N | Generate again at another resolution, from the originals (Regenerate at the current one). |
The gallery copies each member twice, as its original and as its generated version, into a hidden preview scene. Your open scenes are never changed or marked dirty. The copies are removed when you leave the view.
Merge Groups tab
| Control | What it does |
|---|---|
| New group from selection | Create a group from the selected renderers in the active scene. |
| Name | Rename the group. |
| State, Spread | Combined or separate, whether the output is current, and the group's size. A note appears when Unity 6's GPU Resident Drawer is on and members repeat a mesh and material. |
| Split by lightmap | Shown when the members are in more than one lightmap: one group per lightmap (see Lightmapped members). |
| Make settings match | Shown when the members' renderer settings differ: gives every member the settings most members have, in one Undo step. |
| Combine / Regenerate, Separate | Combine the members, rebuild the combined mesh, or show the members again. |
| Delete group | Delete the group (asks first); members are restored and the mesh asset is kept. |
| Add selected, Remove selected, Pick in Scene view, Select all, Select combined | Edit and inspect membership. |
| Member list | Each member with its materials and a dot: green when combined, grey when separate, amber when it cannot combine (hover for why). Atlas: … opens the atlas the member is in. Click a row to select the object; its × removes just that member. |
Build Check tab
| Control | What it does |
|---|---|
| Check again | Run the check again. |
| Fix all | Generate, apply and combine again whatever is out of date. |
| Scene optimisation | The open scenes' before and after numbers. |
| Per issue | Its fixes, Open to go to the atlas or group, and Select for the scene objects it names. |
What is stored where
| What | Where |
|---|---|
| The tool | Assets/Kit Optimizer/ (or wherever your file: dependency points). |
| Atlas definitions (settings, island rules, profile copy, last output record) | Assets/KitOptimizer/Atlases/*.asset |
| Generated atlas textures, meshes and materials | Assets/KitOptimizer/Generated/<atlas>/vNNN/: the current version, the previous version (for Undo), and earlier versions still in use. Unused older versions are removed only when ownership and contents pass safety checks. |
| Combined meshes of merge groups | Assets/KitOptimizer/Generated/Merged/ |
| Output shader template materials | Assets/KitOptimizer/Templates/ |
| Generated texture preview tiles | Assets/KitOptimizer/Previews/ |
| Placed library packs | Assets/KitOptimizer/Library/<pack>_<id>/ |
| Which library revisions this project uses | Assets/KitOptimizer/Library/LibraryState.asset |
| Atlas recovery catalogs | Beside project atlas definitions as ... Recovery.asset; package-defined atlases use Assets/KitOptimizer/Recovery/. Keep catalogs and their .meta files with the project. |
| Pending library placement recovery | Library/WorldPropManager/PlacementTransactions/, including transaction records and .blob backups; preserve the entire folder until recovery succeeds. |
| Memberships, originals and merge groups of a scene | The [Kit Optimizer] object in that scene (EditorOnly, removed from builds) |
| Combined renderers | Under [Kit Optimizer Combined] in the scene |
| The library folder's location | Unity's editor preferences on this computer (shared by all projects) |
| The library itself | Your library folder: library.json, packs/, blobs/ (stored files) and profiles/ (saved shader profiles) |
Retained output. Inspect retained paths before cleanup. Output is kept if ownership is unproven, files changed, unrelated additions exist, or rollback is incomplete. Preserve anything needed for recovery.
Temporary folders are removed when the operation finishes: Assets/KitOptimizer/Staging/ during imports, and Assets/__WpmTempImport/ while reading some texture formats.
Tip: Commit
Assets/KitOptimizer/to version control with your project. Atlas definitions and generated outputs belong to the project, and your scenes reference them.
Working in a team
- Locking version control. Some version control systems keep files read-only until they are checked out (Perforce, Plastic SCM). Updating a placed pack then checks its files out through Unity's version control integration first. A file that stays read-only stops the update before anything changes.
- Line endings. Git can check Unity's text assets out with Windows line endings (
core.autocrlf). The library compares them in Unity's own form, so placed assets do not count as edited because of it. - Copied scenes. A scene saved under another name keeps its merge groups. Combining again in the copy writes a mesh of its own, so the original scene's combined objects stay as they are.
- Branches. When two branches both generate the same atlas, both create the next version folder (for example
v002) with different files. When you merge, take one side's atlas definition together with its version folder, then generate again if needed.
Undo, restore and disable
| Action | How to reverse it |
|---|---|
| Adding or removing members | Undo, or remove or add them again. |
| Apply | Restore originals, or Undo. |
| Restore originals | Apply, or Undo. |
| Unticking Enabled | Tick it again, then Apply. A disabled atlas keeps its setup and outputs, shows the originals and raises no build reminders. |
| Generate | Undo returns to the previous output, kept until the next generation. |
| Island rules, settings, pack modes | Undo, or change them back. |
| Combine | Separate, or Undo. |
| Separate | Combine, or Undo. |
| Delete group | Members are restored first; create a new group to combine them again. |
| Deleting an atlas | Not undone by Undo. Restore the definition from the Recycle Bin (Trash) into the same folder, open the scenes that held its members, add them again and click Generate & Apply. |
| Library import | Each import is a revision; older revisions stay in the library, and projects keep their revision until you update them. |
Disabling first attempts restoration and can be refused. Confirm it succeeds.
Generating keeps your original assets unchanged. Older unused versions are removed only after safety checks; inspect retained paths in warnings. Restore originals needs usable, unambiguous recovery records and originals.
When restoring is refused
Restore originals or disabling an atlas can report missing or ambiguous originals. Then:
- Leave the atlas definition, generated files, recovery catalog and scene records in place.
- Recover missing originals and their
.metafiles from a known backup, or resolve the specific ambiguous copy identified in the warning. - Use Help > Report a Problem if you cannot establish which originals belong to it.
Important: Do not delete output or recovery data to silence the warning. Open and check every affected scene before deleting an atlas; a closed scene or prefab may still reference its output.
Limitations
Platforms and versions
- Editor platforms: tested on the Windows editor. The tool has no native code, but the macOS and Linux editors have not been tested yet.
- Unity 2022.3 LTS and Unity 6, with the Built-in Render Pipeline, URP or HDRP. Custom pipelines and other Unity versions are not tested.
- Build platforms: desktop builds are the target. Android and iOS builds are not evaluated.
Atlases
- Unsupported shader features. These are refused with a reason, and the member keeps its original material:
- Standard's parallax (height) maps, and its detail maps when they use UV0 (detail maps on UV1 are atlased);
- URP Lit's parallax, detail and clear coat maps;
- HDRP Lit's detail maps, height maps, displacement, bent normal maps, object-space normal maps, refraction, base or emissive maps on another UV set, and planar or triplanar mapping;
- HDRP Unlit's distortion.
- Packing without scaling. Islands are moved, never scaled on their own.
- When the content does not fit and Detail is Fit to page, every texture set is scaled by the same factor and resampled from its originals, and that is reported. Otherwise texels stay exact.
- Regions are turned only when you allow it (Rotate regions to fit, built-in profiles only). Then they are only flipped across the diagonal, which also copies texels exactly.
- Free rotation to any angle is never used.
- Precision of atlas maps.
- A map with EXR or HDR sources is written as an EXR (32-bit float, values above 1 kept).
- A data map (linear, such as occlusion, masks or height) with 16-bit PNG sources is written as a 16-bit PNG.
- 8-bit members of such a map are copied exactly as the shader reads them.
- sRGB colour maps with 16-bit sources stay 8-bit (sRGB formats are 8-bit), and so do maps for another shader's output template. Both are reported.
- The output's import format follows the source's, so a compressed source gives a compressed atlas map.
- Tiling textures. A member whose UVs repeat its texture more than Tiled textures allows (up to 8 repeats) keeps its original, with a reason. The other members using that texture are still atlased. Each allowed repeat takes its own page room.
- Baked values are rounded to 8 bits in 8-bit maps. Legacy VertexLit's tint, and the smoothness of a material that takes it from its albedo's alpha, cannot be baked and must match.
- Renderers with additional vertex streams (vertex-baked lighting) are refused when their submeshes would need vertex splitting.
- Gallery shows skinned members in their bind pose.
Merging and lighting
- Merging needs compatible active, opaque mesh renderers.
- Different materials are kept as distinct submeshes, so one renderer need not be one draw call.
- Lightmapped members must share one lightmap.
- Probe-lit members must pass the shared-anchor or probe-lighting checks described in What can be merged.
- Vertex-lit members (the third-party lightmapper's vertex groups) combine when they all are.
- Skinned meshes, LOD groups, moving objects and material property blocks other than the lightmapper's are refused.
- Bakes of selected groups only and Unity's Auto Generate previews do not separate and recombine groups automatically. A selected-groups bake is reported.
- Realtime global illumination (Enlighten): members with realtime GI data are refused, because a combined renderer is not in its precomputed data.
- After a lightmap bake the combined renderer is a new object, so bake occlusion culling after lighting, not before.
- Scenes loaded additively at runtime that each have their own lightmaps:
- With Unity's lightmapper, a combined renderer moves to its lightmap's new place with the rest of its scene. This is tested with a scene added after another lightmapped one.
- With a third-party lightmapper, its own lighting component places the lightmaps, and the combined renderer is registered with it. That case has not been tested yet.
Library imports
- Painter and PBR download imports:
- An ORM or ARM map that exists only as EXR cannot be converted, and separate roughness and metallic maps are not used in its place.
- An EXR-only normal map's direction is not measured.
- An opacity map is not combined with a base colour of another size.
Troubleshooting and FAQ
Where are the advanced settings?
Tick Advanced at the right of the window's tab bar. It is there in every tab. Untick it to go back to basic mode.
Advanced mode also shows:
- in the Atlases tab: Edit… next to the shader profile, Padding, Thorough packing, Rotate regions to fit, Detail, Tiled textures, Resample mismatched maps, Texel density, Texture import, Mask, the Texture sets and Layout comparison sections, Move selected here and Include all matching, and the Output and Islands views;
- in the Library: Prefer prepared versions, the asset details' Prepared version with Prepare, and Use prepared version.
The Memory view is in basic mode, and its Import settings section sets the same Texture Import preset as Texture import. The import dialog's Prepare on import is always shown, and so is Use original version for a pack placed as its prepared version.
Hidden settings keep their values and still apply. An atlas's Setup view says in basic mode when one of them is changed.
The choice is remembered on this computer.
Atlases
"The content does not fit on one page."
This happens with Detail at Full (exact texels). Nothing was written.
- Choose Fit to page to scale it to the page instead.
- Or use Find a page that fits, Propose a split, or a Detail reduction.
See When the content does not fit.
A member is marked "excluded".
Hover over the word for the reason. Common ones:
- A map with a different size from the set's reference map. Turn on Resample mismatched maps.
- UVs that repeat the texture more often than Tiled textures allows.
- A map with its own tiling or offset. The shader applies it to that map only, and the atlas can keep only the main map's.
- A texture with no stored texels: a render texture, or a texture inside a model or
.assetwhile the editor runs without a graphics device. - A material feature the profile does not cover.
Textures inside a model or .asset are read as the GPU samples them.
Generation lists conflicts in red.
Members that share an atlas material must agree on values the atlas cannot store in texels, such as render mode, keywords or normal strength. You can:
- make the materials agree;
- move the odd members to another atlas;
- turn on Bake tints and strengths for tints and map strengths;
- or edit a copy of the input profile to ignore a value that does not matter.
The atlas says "stale" although I changed nothing.
Something it was generated from changed:
- a member, a material, or a mesh;
- a texture file or its import settings;
- a setting, a rule or the template;
- the project's colour space (Gamma or Linear);
- or the tool version, after an update.
Upgrading Unity also imports models again, so atlases and merge groups then show as out of date.
Click Generate, or Fix all in the Build Check.
If the reason names a scene that was closed without saving after the last generation: which generated mesh each member shows is stored in the scene. Closing it with Don't Save after generating loses that, while the atlas files stay. Generate again (or Fix all) and save the scene.
Generation says Unity imported the working copy of a texture smaller than its file.
A texture size limit applies to every import in this project. It is either Build Settings > Asset Import Overrides > Max Texture Size, or a project script that changes texture imports. Remove the limit while you generate.
The generation notes say a texture set's files are larger than this project imports them (Max Size).
The atlas copies the full detail of the files. Unity shows the originals at their import setting's Max Size, so the atlas looks sharper than the originals do now and needs more memory.
To match what Unity shows, choose the Detail reduction that the note names for that texture set, then generate again.
Some members still show the originals after Generate.
Generate on its own does not apply the output the first time. Click Apply, or use Generate & Apply, which does both.
After that, regenerating updates applied members automatically.
The lighting of an atlased MonoSH member looks flat with another shader.
The output shader may not decode MonoSH. Switch its template to MonoSH, or use Members' shader for that atlas.
Can I edit the generated textures or meshes?
You can, but your edits are lost on the next generation, because outputs are always regenerated from the originals. Edit the original assets and regenerate instead.
How do I remove an atlas?
- Open every scene that uses the atlas.
- Use Restore originals or untick Enabled.
- Confirm restoration and disabling actually succeed, inspect the members and save.
- Only delete the definition and generated folder after confirming that no scene, prefab, material or other asset references that output.
If either action is refused, keep the definition, outputs, recovery catalog and scene records until the cause is resolved. Keep recovery data while any affected copy remains unresolved.
Important: Deletion is not a substitute for restoration.
Library
Updating a pack says files are read-only.
Your version control keeps files that are not checked out read-only, and Unity's version control integration could not check them out. Check them out (or make them writable), then update again.
Imported leaves or glass use a Fade material.
More than 3% of their opacity map's texels are partly transparent (soft or feathered edges), so the material blends instead of cutting out.
If you prefer Cutout, change the material's Rendering Mode in your project. The material then counts as edited in that project, so updating its pack there reports it instead of overwriting it.
The library folder cannot be chosen.
It must be outside every Unity project, including the one you have open. Choose a folder such as D:\Asset Library.
A placed asset is missing its shader or script.
Scripts and packages are not copied into the library, only recorded. That includes shaders that come from a package. (Shaders in the importing project's own folders are copied with the materials that use them.)
The asset details list what it needs. Install those in the project.
Placing reports a collision.
The project already has a file with the same GUID or path but different content, for example an edited copy. Nothing was written.
Remove or rename the conflicting file, or keep using the project's copy.
Merge groups and lighting
A merge group is refused because its members are in different lightmaps.
Click Split by lightmap to make one group per lightmap, or bake again so that the members share one lightmap. See Lightmapped members.
The Build Check warns that your lightmapper version does not raise full-bake events.
With that version, combined merge groups cannot be separated automatically before a bake. Separate them in the Merge Groups tab before you bake, and combine them again afterwards.
After a bake, a group says it was separated for a bake that did not finish.
The bake was cancelled or failed. Click Combine in the Merge Groups tab, or Combine again in the Build Check.
Builds
Do my players need Kit Optimizer?
No. Builds contain only ordinary meshes, materials and textures. Editor data is removed when building.
Glossary
| Term | Meaning |
|---|---|
| Atlas | A set of shared texture pages, plus the meshes and material that use them, generated from several members. |
| Atlas definition | The asset that holds an atlas's settings, rules and last output record. |
| Member | A material slot of a renderer that belongs to an atlas, or a renderer that belongs to a merge group. |
| Texture set | Members whose materials use the same textures in the same way. Their texels are stored once. |
| Reference map | The map whose size defines a texture set's texel grid (for Standard materials, the albedo). |
| UV island | A connected piece of a mesh's UV layout. |
| Overlap group | Islands whose triangles genuinely overlap, placed together so shared texels are stored once. |
| Placement | One unit the packer moves: an island, an overlap group, a whole layout or a whole texture. |
| Pack mode | How a texture set is placed: Repack Islands, Keep Layout, Keep Whole Texture, Keep Whole Texture Cropped or Original. |
| Padding | Extra texels copied around each placement so mipmaps and filtering stay clean. |
| Detail reduction | Resampling a set to 1/2, 1/4 or 1/8 of its size per axis before packing, from the original files. |
| Fingerprint | A record of everything an output was generated from. When it no longer matches, the output is stale. |
| Stale | Generated, but from inputs that have changed since. |
| Apply / Restore | Show the generated output on the members, or show their original assets again. |
| Shader profile | How members' materials are read (input) and which shader and textures the atlas material uses (output). |
| Template material | The material, edited with the output shader's own inspector, that every generated material copies. |
| Packed texture | A generated texture that combines channels of several maps (for example ORM). |
| MonoSH | A directional lightmap mode, offered by some third-party lightmappers, that stores directional lighting compactly. Shaders must decode it. |
| Lightmap group | A lightmapper setting, where available, that keeps chosen objects in the same lightmap. |
| Merge group | Objects combined into one renderer, reversibly. |
| Library | The folder on your computer that stores packs for all your projects. |
| Pack, revision | A collection of library assets, and one saved state of it. |
| Prepared version | A pack placed with smaller texture imports of the same source files. |
| Build check | The list of differences between the open scenes and their declared atlas and merge state. |
| EditorOnly | A Unity tag; objects with it are removed from builds. |
Reporting a problem
If something does not work as described here, Tools > Kit Optimizer > Help > Report a Problem (or Report a problem at the bottom of the Home tab) makes a report to send with your message:
- Write what you did, what you expected and what happened instead under What happened at the top.
- Read the rest; you can edit or remove anything.
- Click Save… and attach the file to your message, or Copy and paste it. Email… opens your email app with a new message to support. The window says where to send it.
What the report holds:
- versions, the operating system and graphics device, and relevant settings;
- this project's atlas and open-scene merge status, and Build Check issues;
- recent tool messages with stack traces.
No asset files are attached. Names, paths and diagnostic text can remain: only the project and home folders are shortened to <project> and ~. Review it before sharing.
Reopening preserves your draft. Make again replaces it with a current snapshot.
If a tab of the window hits an error, it shows a red notice with a Report a problem button instead of breaking; the error is in the report's recent messages. A passing error clears by itself: the tab tries again after a moment, and again a few seconds later. If the notice stays, Try again retries at once (so does changing the selection or the scene), and Report a problem makes the report. If Kit Optimizer's scripts do not compile at all (for example after moving to a new Unity version), the report cannot be made: copy the first red errors from the Console instead, with your Unity version.
Support and legal
- Support: email texelwright@protonmail.com, with the report from Help > Report a Problem attached (see Reporting a problem).
- Licence: Kit Optimizer is licensed under the Standard Unity Asset Store End User License Agreement. Copyright © 2026 Texelwright.
- Version and notices: Tools > Kit Optimizer > Help > About shows the installed version.
CHANGELOG.mdin the tool's folder lists the changes in each version. - Third-party software: Kit Optimizer includes a C# port of xatlas's chart packer, under the MIT licence. See Help > Third Party Notices.
- Trademarks: Unity is a trademark or registered trademark of Unity Technologies. Adobe and Adobe Substance 3D are either registered trademarks or trademarks of Adobe in the United States and/or other countries. All other trademarks are the property of their respective owners.
Kit Optimizer is not affiliated with or endorsed by Unity Technologies or Adobe.